Sunday, June 9, 2013

Understanding ELSA Query Performance

Most queries in ELSA are very fast and complete under a second or two.  However, some queries can take several seconds or even several minutes, and it can be annoying to wait for them.  A recent update to ELSA should help reduce the likelihood of having queries that take longer than a second or two, but understanding what factors are involved with query execution time can help a user to both write better queries and to take full advantage of the new improvements.

First, let's look at what happens when ELSA makes a query.  ELSA uses Sphinx as its search engine, and it uses two types of Sphinx indexes.  The first is a "temporary" index that ELSA initially creates for new logs which stores the fields (technically, attributes) of the events in RAM, deduplicated, using Sphinx's default "extern" docinfo.   The other is the "permanent" form which stores the attributes using Sphinx's "inline" docinfo.  Inline means that the attributes are something like a database table, where the name of the table is the keyword being searched, and all entries in the table correspond to the hits for that keyword.

So let's say we have log entries that look like this:

term1 term2 id=1, timestamp=x1, host=y, class=z
term1 term3 id=2, timestamp=x2, host=y, class=z

Sphinx's inline docinfo would store this as three total keywords, each with the list of attributes beneath it like a database table:

term1
id | timestamp | host | class
1  | x1        | y    | z
2  | x2        | y    | z


term2
id | timestamp | host | class
1  | x1        | y    | z


term3
id | timestamp | host | class
2  | x2        | y    | z

So when you query for +term1 +term2, Sphinx does a pseudo-SQL query like this:

SELECT * FROM term1 JOIN term2 WHERE term1.id=term2.id

Most terms are fairly rare, so the join is incredibly fast.  However, consider a situation in which "term1" appeared in hundreds of millions of events.  If your query includes "term1," then the number of "rows" in the "table" for that term could be millions or even billions, making that JOIN extremely expensive, especially if you've asked for the query to filter the results to specific time values or do a group by.

In addition to the slow querying, note that the disk required to store the Sphinx indexes is a function of the number of attributes it must store in these pseudo-tables.  So, a very common term will incur a massive disk cost to store the large pseudo-table.

Below is the count of the one hundred most common terms in a test dataset of ten million events.  You can think of each bar representing the number of rows in the pseudo-tables, so a query for 0 - (the two most common terms) would require a join across a pseudo-table with 45,355,729 rows multiplied with another with 33,907,455 rows.  Note how quickly the hit count of a given term drops off.


Stopwords

This is where Sphinx stopwords save the day.  Sphinx's indexer has an option to calculate the frequency with which keywords exist in data to be indexed.  You can invoke this by adding --buildstops <outfile> <n> --buildfreqs to the indexing command and it will find the top n most frequent keywords and write them to outfile, along with the count for how many times the keyword appeared.  This file can be referred to by a subsequent run of indexer, sans the stopword options, to ignore these n most frequent keywords.  This will save a massive amount of disk space (expect savings of around 60% percent) and also guarantee that queries including the word won't take forever, because the index won't have any knowledge of them.

However, this obviously means that the keywords can't be searched.  To cope with this, ELSA has a configuration item in the elsa_web.conf file where you can specify a hash of stopwords.  If a query attempts to search one of these keywords, then one of several things can happen:

  1. If some terms are stopwords and some are not, then the query will use the non-stopwords as the basis for the Sphinx search, and results will be filtered using the stopwords in ELSA.
  2. If all terms are stopwords, the query is run against the raw SQL database and Sphinx is not queried at all.
  3. If a query contains no keywords, just attributes (such as a query for just a class or a range query), the query will be run against the raw SQL database and not Sphinx.
Currently, stopwords must be manually created and added, but the optimization code exists in the current ELSA codebase.  I will be adding automatic stopword management in the near future so that all ELSA users will benefit from the massive disk savings and predictable performance that shifting stopword and attribute-only searches to SQL can provide.

Sunday, April 28, 2013

ELSA Resource Utilization

I've recently received a number of questions on the ELSA mailing list, as well as internally at work, regarding hardware sizing and configuration for ELSA deployments.  Creating a good environment for ELSA requires understanding what each component does, what its resource requirements are, and how it interacts with the other components.  Generally speaking, with the new web services architecture, designing an ELSA architecture has become incredibly simple because the ideal layout is for all boxes to have the same components running.  It really is as simple as adding more boxes, with the small nuance of a possible load balancer in front of multiples.  To see why, let's take a closer look at each of the components.

The Components

An ELSA instance consists of three categories of components for receiving logs: parse, write, and index.  Here they are individually:
  1. Syslog-NG receive/parse
  2. elsa.pl parse/write
  3. MySQL load
  4. Sphinx Search index
  5. Sphinx Search consolidate
Logs are available for search after the initial Sphinx Search indexing occurs, but they must be consolidated to remain on the system for extended periods of time ("temp" indexes versus "permanent" indexes).  Each phase in the life of an inbound log requires varying amounts of CPU and IO time from the system which, together, create the overall maximum event rates for the system.


However, each phase does not use the same amount of IO resources versus CPU resources, and so some of the phases benefit greatly from having at least two CPU's available to run tasks concurrently.  Specifically, a separate CPU is used for Syslog-NG to parse logs versus elsa.pl to parse the output from Syslog-NG.  The loading of logs into MySQL and indexing of logs using Sphinx from MySQL both can occur on separate CPU's, meaning that a total of four CPU's could be used simultaneously, if available.  

Properly selecting an ELSA deployment architecture means providing enough CPU to a node (without wasting resources) as well as ensuring that there is enough available IO to feed those CPU's.  Below is a high-level comparison of which components use a lot of IO versus which use a lot of CPU.  It's far from scientific as represented here, but it does paint a helpful picture of what each component requires for understanding when specing a system.


As the diagram shows, receiving and parsing uses a lot of CPU but not much IO, whereas indexing uses more IO than CPU.  This is a big reason why running the indexing on the same system that is receiving logs makes a lot of sense.  If you separate out boxes into just parsers or just indexers, you are likely to waste IO on one and CPU on the other.  As long as the box you're using has four cores, there isn't a situation in which it helps to have a separate box do the parsing from the box doing the indexing. Separating the duties would only add unnecessary complexity.  If you do decide to split the workloads, be sure to load all ELSA components on both using standard ELSA installation procedures to avoid dependency pitfalls.

Search Components

What about on the search side of things?  Once the indexes are built and available, the web frontend will query Sphinx to find document ID's which correspond to individual events.  It will then take that list of ID's and retrieve them from MySQL.


Almost all of the heavy lifting is done by Sphinx as it searches its indexes for the full-text query given.  It will delve through billions of records and return a list of result doc ID's.  This list of (one hundred, by default) doc ID's are then passed to MySQL for full event retrieval.  The ID's are the MySQL tables' primary key, so this is a very fast lookup.  From a performance and scaling standpoint, ninety-nine percent of the work is done by Sphinx, with MySQL only performing row storage and retrieval.

Within Sphinx, a query is a list of keywords to search for.  Each resultant keyword represents a pseudo-table of result attributes which comprise ELSA attributes (host, class, source IP, etc.).  A very common search result will have a very large pseudo-table, and Sphinx will try to find the best match for the given table.  This means that even though the search is using an index, it could take a long time to find the right match if there are a lot of potential records to filter.  ELSA deals with this by telling Sphinx to timeout after a configured amount of time (ten seconds total, by default) with the best matches it has thus far.  This prevents a "bad" query from taking forever from the user's perspective, and if desired, the user can override this behavior with the timeout directive.

If a query has to scan a lot of these result rows, then the query will be IO-bound.  If it doesn't, then the query will complete in less than a second with very little CPU or IO usage.  It should be noted that temporary indexes do not contain the pseudo-tables, and therefore, queries against temporary indexes (which is almost always the case for alerts), execute in a few milliseconds.  So, the total amount of resources required for queries boils down to how many "bad" queries are issued against the system.  The more queries for common terms, the more IO required, which could cut into IO needed for indexing.

If IO-intensive queries will be frequent, then it might make sense to replicate ELSA data to "slave" nodes using forwarding.  Configuring ELSA to send its already-parsed logs to another instance will allow for that instance to skip the receiving and parsing step and just index records.  It can then serve as a mirror for queries to help share the query load.  This is not normally necessary, but could be desired in certain production environments.

Choosing the Right Hardware

My experience has shown that a single ELSA node will comfortably handle about 10,000 events/second, sustained, even with slow disk.  As shown above,  ELSA will happily handle 50,000 events/second for long periods of time, but eventually index consolidation will be necessary, and that's where the 10,000-30,000 events/second rate comes in.  A virtual machine probably won't handle more than 10,000 events/second unless it has fairly fast disk (15,000 RPM drives, for instance) and the disk is set to "high" in the hypervisor, but a standalone server will be able to run at around 30,000 events/second on moderate server hardware.

I recommend a minimum of two cores, but as described above, there is work enough for four.  RAM requirements are a bit less obvious.  The more RAM you have, the more disk cache you get, which helps performance if an entire index fits on disk.  A typical consolidated ("permanent") index is about 7 gigabytes on disk (for 10 million events), so I recommend 8 GB of RAM for best performance, though 2-4 GB will work fine.

RAM also comes into play in temporary index count.  When ELSA finds that the amount of free RAM has become too small or the amount of RAM ELSA uses has surpassed a configured limit (80 percent and 40 percent, by default, respectively), it will consolidate indexes before hitting its size limit (10 million events, by default).  So, more RAM will allow ELSA to have more temporary indexes and be more efficient about consolidating them.

In conclusion, if you are shopping for hardware for ELSA, you don't need more than four CPU's, but you should try to get as much disk and RAM as possible.

Sunday, March 24, 2013

ELSA Updates

ELSA has undergone some significant changes this month.  Here are the highlights for the most recent changelog:
  1. Parallel recursion for all inter-nodal communication
  2. Full web services API with key auth for query, stats, and upload
  3. Log forwarding via upload to web services (with compression/encryption)
  4. Post-batch processing plugin hook to allow plugins for processing raw batch files.
There have also been some important fixes, most prevalent being stability for indexing, timezone fixes, and the deprecation of the livetail feature until it can be made more reliable.  The install now executes a script which validates that the config is valid and attempts to fix the script where it can.  Additionally, it is now trivial to configure ELSA to store MySQL data in a specific directory (like under /data with the rest of ELSA) instead of in its native /var/lib/mysql location, which tends to be on a smaller partition than /data, using the new "mysql_dir" configuration directive.

The biggest difference operationally will be that all ELSA installations must have both the node and the web code installed unless the node will only be forwarding logs.  Logs will be loaded via the cron job that has previously only been used to execute scheduled searches.  Other than that, neither end users nor admins will see much of a change in how they use the system.  An exception is for orgs which had ELSA nodes in different locations which had high latency.  Performance should be much better for them due to the reduced number of connections necessary.

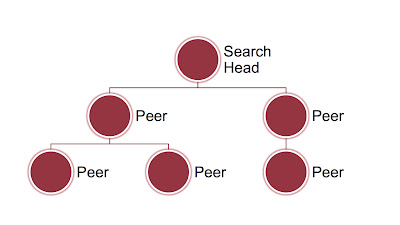
Architecturally, the new parallel recursion method allows for much more scalability over the older parallel model.  I spoke about this at my recent talk for the Wisconsin chapter of the Cloud Security Alliance.  The basic idea is that any node communicating with too many other nodes becomes a bottleneck for a variety of technical reasons: TCP handles, IO, memory, and latency. 
The new model ensures O(log(n)) time for all queries, as long as the peers are distributed in a evenly-weighted tree, as would normally occur naturally.  The tree can be bi-directional, with logs originating below and propagating up through the new forwarding system using the web services API.  An example elsa_node.conf entry to send logs to another peer would be:

{
  "fowarding": {
    "destinations": [ { "method": "url", "url": "http://192.168.2.2/upload", "username": "myuser", "apikey": "abc" } ]
  }
}

On the search side, to extend queries from one node down to its peers, you would tell a node to add a peer it should query to the peer list in elsa_web.conf:

{
  "apikeys": { "elsa": "abc" },
  "peers": {
    "127.0.0.1": {
      "url": "http://127.0.0.1/",
      "username": "elsa",
      "apikey": "abc"
    },
    "192.168.2.2": {
      "url": "http://192.168.2.2/",
      "username": "elsa",
      "apikey": "def"
    }
}

This will make any queries against this node also query 192.168.2.2 and summarize the results.

Generally speaking, you want to keep the logs stored and indexed as close to the source that generated them, as this will lend itself naturally to scaling as large as the sources themselves and will conserve bandwidth for log forwarding (which is negligible, in most cases).

Orgs with just a few nodes won't benefit terrifically from the scaling, but the use of HTTP communication instead of database handles does simplify both encryption (via HTTPS) and firewall rules with only one port to open (80 or 443) instead of two (3306 and 9306).  It's also much easier now to tie in other apps to ELSA with the web services API providing a clear way to query and get stats.  Some basic documentation has been added to get you started on integrating ELSA with other apps.

Upgrading should be seamless if using the install.sh script.  As always, please let us know on the ELSA mailing list if you have questions or problems!

Friday, February 22, 2013

Good News for ELSA

As seen on the ELSA mailing list:

Dear ELSA community,

I want to officially announce that I've taken a position with Mandiant Corporation. At Mandiant, I will continue work on ELSA.  ELSA will, of course, remain free and open-source (GPLv2), and I will continue to add features and bug fixes. Mandiant is working on building additional capabilities that rely on ELSA, and I am part of that effort.  

This is very exciting for both myself and the community!  It guarantees I will have time to work on ELSA, it means there will be a form of ELSA commercial support (details to follow at a later date), and it means that Mandiant is committed to making sure that ELSA will continue to be a strong, open source platform for years to come.

I also want to affirm what it does not mean:  ELSA will not become "hobbled."  There will not be "disabled" features in the web console, etc.  The additional capabilities we are building at Mandiant will be a separate, though related project.  I also want to reassure everyone that any patterns, plugins, or code contributed from the community will continue to go back into ELSA.

So, you can now know with certainty that there will always be a free, open source, and community supported ELSA!
 
As always, please don't hesitate to ask if you have any questions or concerns.

Thanks,

Martin

Tuesday, October 23, 2012

Active Defense

One of the recurring topics of discussion in advanced security circles is how far offensive (or counter-offensive, if you prefer) measures can be taken, such as hacking back into attacker networks to raid and destroy stolen intel.  However, I want to remind the community that there are other kinds of active defense which are not sexy but can be effective.

The mass-takedown of 3322.org was a recent example of doing more on defense than simply blocking inbound attacks with devices or expelling infiltrators.  This defense has been going on for years with takedowns of many botnets (Waledac, Rustock, Kelihos and Zeus, as per The Register article).  In the 3322.org takedown, Microsoft identified a crucial piece of infrastructure for a botnet and worked within the legal system to "compromise" the botnet's command-and-control server names. 

However, you don't have to be a software giant with an army of lawyers making takedowns to deprive adversaries of critical resources.  Anyone can help make life harder for criminals if you have the time, motivation, and tools to do so.

Notification

When you are working an incident for your org, whenever possible, attempt to contact any compromised orgs that are unwittingly participating in the botnet infrastructure to help inform and/or remediate.  It may seem like a small gain, but even dismantling a single distribution point can make an impact on a botnet by forcing the criminals to exert more of their own resources to keep up.

In a recent investigation, I discovered that a local news site's ad banners were acting as routers to crimeware kit landing pages.  Ad-initiated drive-by-downloads have been a typical infection vector for years, so when I called the local company to let them know what was occurring, I expected to find that the ads they served were not under their control.  Instead, I discovered that their primary ad server had been compromised through a recent vulnerability in the OpenX ad server, making all ads on the site malicious.  Though local, the site is still major enough that most of my friends and family, and tens of thousands of other citizens in my city, will visit it at some point every few days.  The day I discovered the compromise happened to be the day President Obama was visiting, so traffic to the news site was at a peak.  Working with the staff at the news site may have saved thousands of fellow citizens from becoming part of a botnet, and it only took a few minutes of my time.

When you work with external entities, remember to encourage them to contact the local police department to file a report.  The police will pass the info up the law enforcement chain.  This is important even for small incidents in which damages are less than $5,000 because they may aid a currently ongoing investigation with new evidence or intel.  It's also important to get law enforcement involved in case they are already aware of the compromise and have it under surveillance to help make an arrest.  The last thing you want to do is let a criminal escape prosecution by accidentally interfering with an ongoing investigation.

Plugging the fire hose of malicious ad banners was good, but my investigation didn't stop with the local news site.  The "kill chain" in the infections routed through yet another hacked site at a university.  I took a few seconds to do a whois lookup on the domain and found a contact email.  I took a few more seconds to send an email to the admin letting them know they had been compromised.  Less than a day later, the admin responded that he had cleaned up the server and fixed the vulnerability, and the criminals had another piece of their infrastructure taken back.

While they will undoubtedly find a new hacked server to use as a malicious content router, hacked legit servers are still a valuable commodity to a botnet operator, and if enough low-hanging fruit is removed from the supply, it could make a real difference in the quantity of botnets.  At the very least, it is forcing the opposition to expend resources on finding new hacked sites to use, which is time they cannot use to craft better exploits, develop new obfuscation techniques, recruit money mules, and sleep.  Even reconfiguring a botnet to use a new site will probably take more time than it took me to send the notification email.

Remediation

Even at large sites with dedicated IT staff, it may not be simple or easy for the victim to remove the malicious code and fix the vulnerabilities.  In some cases, hand-holding is necessary.  In many cases, the actual vulnerability is not remediated and the site is compromised again.  This can be disheartening, but even though it happens, it's still worth it to do the notification.

If a site simply can't be fixed or no one can be contacted, at least submit the site to Google Safebrowsing or another malicious URL repository.

I would wager that there are more IT security professionals than there are botnet operators on this planet.  Let's prove that by raising the threshold of effort for criminals through victim notification.

Wednesday, October 3, 2012

Multi-node Bro Cluster Setup Howto

My previous post covering setting up a Bro cluster was a good starting point for using all of the cores on a server to process network traffic in Bro.  This post will show how to take that a step further and setup a multi-node cluster using more than one server.  We'll also go a step further with PF_RING and install the custom drivers.

For each node:


We'll begin as before by installing PF_RING first:

Install prereqs
sudo apt-get install ethtool libcap2-bin make g++ swig python-dev libmagic-dev libpcre3-dev libssl-dev cmake git-core subversion ruby-dev libgeoip-dev flex bison
Uninstall conflicting tcpdump
sudo apt-get remove tcpdump libpcap-0.8
Make the PF_RING kernel module
cd
svn export https://svn.ntop.org/svn/ntop/trunk/PF_RING/ pfring-svn
cd pfring-svn/kernel
make && sudo make install
Make PF_RING-aware driver (for an Intel NIC, Broadcom is also provided). 
PF_RING-DNA (even faster) drivers are available, but they come with tradeoffs and are not required for less than one gigabit of traffic.
First, find out which driver you need
lsmod | egrep "e1000|igb|ixgbe|bnx|bnx"
If you have multiple listed, which is likely, you'll want to see which is being used for your tap or span interface that you'll be monitoring using lspci.  Note that when you're installing drivers, you will lose your remote connection if the driver is also controlling the management interface.  I also recommend backing up the original driver that ships with the system.  In our example below, I will use a standard Intel gigabit NIC (igb).
find /lib/modules -name igb.ko
Copy this file for safe keeping as a backup in case it gets overwritten (unlikely, but better safe than sorry).  Now build and install the driver:
cd ../drivers/PF_RING_aware/intel/igb/igb-3.4.7/src
make && sudo make install
Install the new driver (this will take any active links down using the driver)
rmmod igb && modprobe igb
Build the PF_RING library and new utilities
cd ../userland/lib
./configure --prefix=/usr/local/pfring && make && sudo make install
cd ../libpcap-1.1.1-ring
./configure --prefix=/usr/local/pfring && make && sudo make install
echo "/usr/local/pfring/lib" >> /etc/ld.so.conf
cd ../tcpdump-4.1.1
./configure --prefix=/usr/local/pfring && make && sudo make install
# Add PF_RING to the ldconfig include list
echo "PATH=$PATH:/usr/local/pfring/bin:/usr/local/pfring/sbin" >> /etc/bash.bashrc


Create the Bro dir
sudo mkdir /usr/local/bro 

Set the interface specific settings, assuming eth4 is your gigabit interface with an MTU of 1514:

rmmod pf_ring
modprobe pf_ring transparent_mode=2 enable_tx_capture=0
ifconfig eth4 down
ethtool -K eth4 rx off
ethtool -K eth4 tx off
ethtool -K eth4 sg off
ethtool -K eth4 tso off
ethtool -K eth4 gso off
ethtool -K eth4 gro off
ethtool -K eth4 lro off
ethtool -K eth4 rxvlan off
ethtool -K eth4 txvlan off
ethtool -s eth4 speed 1000 duplex full
ifconfig eth4 mtu 1514
ifconfig eth4 up


Create the bro user:
sudo adduser bro --disabled-login
sudo mkdir /home/bro/.ssh
sudo chown -R bro:bro /home/bro

Now we need to create a helper script to fix permissions so our our Bro user can run bro promiscuously.  You can put the script anywhere, but it needs to be run after each Bro update from the manager (broctl install).  I'm hoping to find a clean way of doing this in the future via the broctl plugin system.  The script looks like this, assuming eth4 is your interface to monitor:


#!/bin/sh
setcap cap_net_raw,cap_net_admin=eip /usr/local/bro/bin/bro
setcap cap_net_raw,cap_net_admin=eip /usr/local/bro/bin/capstats


On the manager:

Create SSH keys:
sudo ssh-keygen -t rsa -k /home/bro/.ssh/id_rsa
sudo chown -R bro:bro /home/bro

On each node, you will need to create a file called /home/bro/.ssh/authorized_keys and place the text from the manager's /home/bro/.ssh/id_rsa.pub in it.  This will allow the manager to login without a password, which will be needed for cluster admin.  We need to login once to get the key loaded into known_hosts locally.  So for each node, also execute:
sudo su bro -c 'ssh bro@<node> ls'

Accept the key when asked (unless you have some reason to be suspicious).

Get and make Bro
cd
 mkdir brobuild && cd brobuild
git clone --recursive git://git.bro-ids.org/bro
./configure --prefix=/usr/local/bro --with-pcap=/usr/local/pfring && cd build && make -j8 && sudo make install
cd /usr/local/bro

Create the node.cfg
vi etc/node.cfg
It should look like this:

[manager]
type=manager
host=<manager IP>

[proxy-0]
type=proxy
host=<first node IP>

[worker-0]
type=worker
host=<first node IP>

interface=eth4 (or whatever your interface is)
lb_method=pf_ring
lb_procs=8 (set this to 1/2 the number of CPU's available)


Repeat this for as many nodes as there will be.

Now, for each node, we need to create a packet filter there to do a poor-man's load balancer.  You could always use a hardware load balancer to deal with this, but in our scenario, that's not possible, and all nodes are receiving the same traffic.  We're going to have each node focus on just its own part of the traffic stream, which it will then load balance using PF_RING internally to all its local worker processes.  To accomplish this, we're going to use a very strange BPF to send a hash of source/destination to the same box.  This will load balance based on the IP pairs talking, but it may be suboptimal if you have some very busy IP addresses.

In our example, there will be four nodes monitoring traffic, so the BPF looks like this for the first node:
(ip[14:2]+ip[18:2]) - (4*((ip[14:2]+ip[18:2])/4)) == 0
So, in /etc/bro/local.bro, we have this:
redef cmd_line_bpf_filter="(ip[14:2]+ip[18:2]) - (4*((ip[14:2]+ip[18:2])/4)) == 0";
On the second node, we would have this:
redef cmd_line_bpf_filter="(ip[14:2]+ip[18:2]) - (4*((ip[14:2]+ip[18:2])/4)) == 1";
Third:
redef cmd_line_bpf_filter="(ip[14:2]+ip[18:2]) - (4*((ip[14:2]+ip[18:2])/4)) == 2";
And fourth:
redef cmd_line_bpf_filter="(ip[14:2]+ip[18:2]) - (4*((ip[14:2]+ip[18:2])/4)) == 3";

Special note:   If you are monitoring a link that is still vlan tagged (like from an RSPAN), then you will need to stick vlan <vlan id> && in front of each of the BPF's.

We wrap a check around these statements so that the correct one gets execute don the correct node, so the final version is added to the bottom of our /usr/local/bro/share/bro/site/local.bro file which will be copied out to each of the nodes:

# Set BPF load balancer for 4 worker nodes
@if ( Cluster::node == /worker-0.*/ )
redef cmd_line_bpf_filter="(ip[14:2]+ip[18:2]) - (4*((ip[14:2]+ip[18:2])/4)) == 0";
@endif   
@if ( Cluster::node == /worker-1.*/ )
redef cmd_line_bpf_filter="(ip[14:2]+ip[18:2]) - (4*((ip[14:2]+ip[18:2])/4)) == 1";
@endif

@if ( Cluster::node == /worker-2.*/ )
redef cmd_line_bpf_filter="(ip[14:2]+ip[18:2]) - (4*((ip[14:2]+ip[18:2])/4)) == 2";
@endif   
@if ( Cluster::node == /worker-3.*/ )
redef cmd_line_bpf_filter="(ip[14:2]+ip[18:2]) - (4*((ip[14:2]+ip[18:2])/4)) == 3";
@endif


Finally, we need to send all of our logs somewhere like ELSA.  We can do this with either syslog-ng or rsyslogd.  Since rsyslog is installed by default on Ubuntu, I'll show that example.  It's the same as in the previous blog post on setting up Bro:

Create /etc/rsyslog.d/60-bro.conf and insert the following, changing @central_syslog_server to whatever your ELSA IP is:

$ModLoad imfile #
$InputFileName /usr/local/bro/logs/current/ssl.log
$InputFileTag bro_ssl:
$InputFileStateFile stat-bro_ssl
$InputFileSeverity info
$InputFileFacility local7
$InputRunFileMonitor
$InputFileName /usr/local/bro/logs/current/smtp.log
$InputFileTag bro_smtp:
$InputFileStateFile stat-bro_smtp
$InputFileSeverity info
$InputFileFacility local7
$InputRunFileMonitor
$InputFileName /usr/local/bro/logs/current/smtp_entities.log
$InputFileTag bro_smtp_entities:
$InputFileStateFile stat-bro_smtp_entities
$InputFileSeverity info
$InputFileFacility local7
$InputRunFileMonitor
$InputFileName /usr/local/bro/logs/current/notice.log
$InputFileTag bro_notice:
$InputFileStateFile stat-bro_notice
$InputFileSeverity info
$InputFileFacility local7
$InputRunFileMonitor
$InputFileName /usr/local/bro/logs/current/ssh.log
$InputFileTag bro_ssh:
$InputFileStateFile stat-bro_ssh
$InputFileSeverity info
$InputFileFacility local7
$InputRunFileMonitor
$InputFileName /usr/local/bro/logs/current/ftp.log
$InputFileTag bro_ftp:
$InputFileStateFile stat-bro_ftp
$InputFileSeverity info
$InputFileFacility local7
$InputRunFileMonitor
# check for new lines every second
$InputFilePollingInterval 1
local7.* @central_syslog_server


Then, 

restart rsyslog

We're ready to start the cluster.  Broctl will automatically copy over all of the Bro files, so we don't have to worry about syncing any config or Bro program files.

cd /usr/local/bro
su bro -c 'bin/broctl install'
su bro -c 'bin/broctl check'


On each node (this is the annoying part), run the bro_init.sh script:
ssh <admin user>@<node> "sudo sh /path/to/bro_init.sh"

This only needs to be done after 'install' because it overwrites the Bro binaries which have the special permissions set.

Now we can start the cluster.

su bro -c 'bin/broctl start'

If you cd to /usr/local/bro/logs/current, you should see the files growing as logs come in.  I recommend checking the /proc/net/pf_ring/ directory on each node and catting the pid files there to inspect packets per second, etc. to ensure that everything is being recorded properly.  Now all you have to do is go rummaging around for some old servers headed to surplus, and you'll have a very powerful, distributed (tell management it's "cloud") IDS that can do some amazing things.

Friday, September 7, 2012

Integrating Org Data in ELSA

Using Big Data is a necessity in securing an enterprise today, but it is only as useful as its relevance to the specific, local security challenges at hand.  To be effective, security analysts need to be able to use org-specific data to provide context.  This is not a new concept, as the idea has been around in products like ArcSight, NetWitness, and Sourcefire's RNA which use both external data sources as well as extrapolation techniques to map out key details such as IP-to-user relationships.

ELSA (and Splunk, to a slightly lesser degree) takes this a step further.  Any database in the org can be queried in the exact same search syntax as normal log searches, and these results can be stored, sent to dashboards, charted, compared, alerted on, and exported just like any other ELSA result.  Let's take an example of an HR database that has names, emails, and departments in it.  Suppose you want to see all of the emails sent from a non-US email server sent to anyone in the accounting department.  An ELSA search using Bro's SMTP logging can find this for you.

First, we setup the HR database for ELSA.  Open the /etc/elsa_web.conf file and add a new datasource to the datasources config section like this (documentation):
"datasources": {                 
  "database": { 
    "hr_database": { 
      "alias": "hr",
      "dsn": "dbi:Oracle:Oracle_HR_database", 
      "username": "scott", 
      "password": "tiger", 
      "query_template": "SELECT %s FROM (SELECT person AS name, dept AS department, email_address AS email) derived WHERE %s %s ORDER BY %s LIMIT %d,%d", 
      "fields": [ 
        { "name": "name" }, 
        { "name": "department" },
        { "name": "email" }
      ] 

Restart Apache, and now you can use the "hr" datasource just like it were native ELSA data.

The first part of the query is to find everyone in accounting:

datasource:hr department:accounting groupby:email_address

This will return a result that looks like this:

suzy@example.com
joe@example.com
dave@example.com

We will pass this "reduced" (in the map/reduce world) data to a subsearch of Bro SMTP logs which reduce the data to distinct source IP addresses:

class:bro_smtp groupby:srcip

Then, we apply the whois (or GeoIP) transform to find the origin country of that IP address and filter US addresses:

whois | filter(cc,us)

And finally, we only want to take a look at the subject of the email to get an idea of what it says:

sum(subject)

 The full query looks like:

datasource:hr department:accounting groupby:email_address | subsearch(class:bro_smtp groupby:srcip,srcip) | whois | filter(cc,us) | sum(subject)

This will yield the distinct subjects of every email sent to the accounting department from a non-US IP.  You can add this to a dashboard in two clicks, or have an alert setup.  Or, maybe you want to use the StreamDB connector to auto-extract the email and save off any attachments, perhaps to stream into a PDF sandbox.

There are unlimited possibilities for combining datasets.  You can cross-reference any log type available in ELSA, as with the HR data.  If you're using a desktop management suite in your enterprise, such as SCCM, you could find all IDS alerts by department:

+classification class:snort groupby:srcip | subsearch(datasource:sccm groupby:user,ip) | subsearch(datasource:hr groupby:department,name)

The fun doesn't have to stop here.  The database datasource is a plugin, and writing plugins is fairly easy.  Other possibilities for plugins could be LDAP lookups, generic file system lookups, Twitter (as in the example I put out on the mailing list today), or even a Splunk adapter for directly querying a Splunk instance over its web API.

To get data that graphs properly on time charts, you can specify which column is the "timestamp" for the row, like this:

{ "name": "created", "type": "timestamp", "alias": "timestamp" }

And to have a numeric value provide the value used in summation, you can alias it as "count:"

{ "name": "errors", "type": "int", "alias": "count" }

ELSA makes use of this for its new stats pages by hard-coding the internal ELSA databases as "system" datasources available to admins.  This allows the standard database entries to produce the same rich dashboards that standard ELSA data fuels.


The ability to mix ELSA data with non-ELSA data on the same chart can make for some very informative dashboards.  Possibilities include mixing IDS data with incident response ticket data, Windows errors with helpdesk tickets, etc.

Don't forget that sharing dashboards is easy by exporting and importing them, so if you have one you find useful, please share it!